Control servo with potentiometer arduino
In this tutorial, it is explained how to control a servo motor with a potentiometer manually. Generally, it is seen that a servo motor is controlled in many other ways such as through the application, in serial monitor using code manipulation, and some other techniques.

Potentiometer:
It is a type of resistor whose value is manually controlled. It consists of three terminals, the end terminals are just like a normal resistor, the middle terminal plays a major role in the variation of resistance of the potentiometer.
Servo motor:
The servo motor consists of VCC, GND, SIGNAL pins. Electrical pulses or signals are given through the signal wire, which determines the movement of the servo motor. Servo motors can rotate in 90 or 180 degrees. To know more about servo motor click here
Aim : To control one or multiple servo motors using potentiometers.
Components required:
1. Arduino UNO/ or any Arduino
2. Potentiometer
3. Servo Motor
4. Connecting wires/ jumper cables
5. Solder kit
Step-1:
This is the circuit diagram of the project we are looking for
– Make sure that the servo motor is connected to one of the PWM pins of Arduino.
– Connect the wiper terminal ( middle terminal ) of the potentiometer to one of the analog pins of Arduino UNO for analog ( distinct values of resistance in a potentiometer) signals. Remaining terminals as shown in the figure.
Connections:
| Potentiometer | Arduino UNO |
| Terminal 1 | 5V |
| Wiper | A0 |
| Terminal 2 | GND |
| Servo Motor | Arduino UNO |
| Signal | 9 (PWM) |
| Power | 5V |
| Ground | GND |
Step-2:
Once the connections are made according to the circuit diagram, write down the code as below
#include  // Servo library is included to use the functions that are required
int degrees=90;       // assigning an integer value to the degrees( servo degree variable )
int sensorvalue=0;   // assigning an integer value to potentiometer variable
Servo servo;

void setup()
{
  pinMode(A0,INPUT);   // declaring the work of A0 pin that is whether to take inputs or give outputs
  servo.attach(9);     // shows that servo motor is attached to pin number 9 of arduino UNO
  Serial.begin(9600);  // initializing serial communication and also activating serial monitor
}
void loop()
{
  sensorvalue=analogRead(A0);  // saying servovalue variable motor to read the value given by potentiometer
  degrees = map(sensorvalue,0,1023,0,180);   //mapping 1023 values of potentiometer to the 180 degrees of servo motor
  servo9.write(degrees); //asking servo motor to write ( execute ) the values given by potentiometer

  delay(10);
}
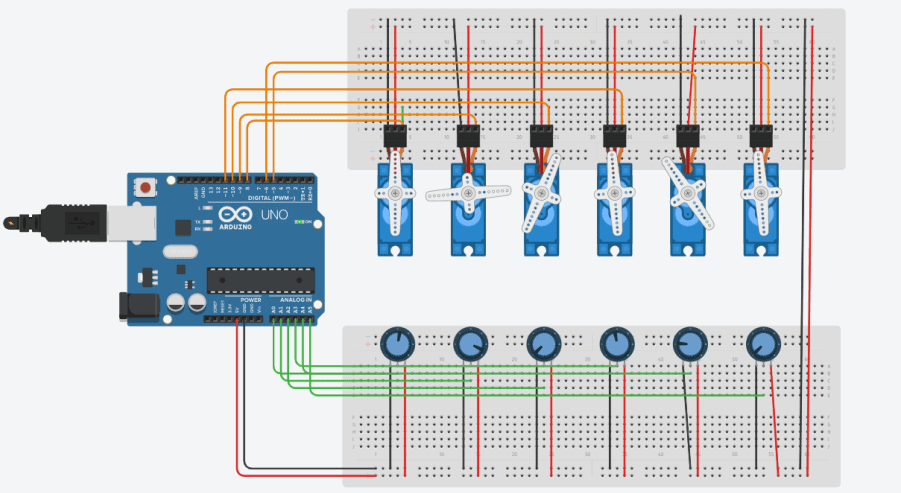
What if you wanted to operate multiple servo motors using multiple potentiometers:
Circuit diagram

Code
#include
int sensorValue = 0;
int outputValue = 0;
Servo servo_9;
Servo servo_10;
Servo servo_11;
Servo servo_3;
Servo servo_5;
Servo servo_6;
void setup()
{
pinMode(A0, INPUT);
pinMode(A1, INPUT);
pinMode(A2, INPUT);
pinMode(A3, INPUT);
pinMode(A4, INPUT);
pinMode(A5, INPUT);
servo_9.attach(9);
servo_10.attach(10);
servo_11.attach(11);
servo_3.attach(3);
servo_5.attach(5);
servo_6.attach(6);
}
void loop()
{
  sensorValue = analogRead(A0);
  outputValue = map(sensorValue, 0 , 1023 , 0 , 180);
  servo_9.write(outputValue);
  delay(10);
  sensorValue = analogRead(A1);
  outputValue = map(sensorValue, 0 , 1023 , 0 , 180);
  servo_10.write(outputValue);
  delay(10);
  sensorValue = analogRead(A2);
  outputValue = map(sensorValue, 0 , 1023 , 0 , 180);
  servo_11.write(outputValue);
  delay(10);
  sensorValue = analogRead(A3);
  outputValue = map(sensorValue, 0 , 1023 , 0 , 180);
  servo_3.write(outputValue);
  delay(10);
  sensorValue = analogRead(A4);
  outputValue = map(sensorValue, 0 , 1023 , 0 , 180);
  servo_5.write(outputValue);
  delay(10);
  sensorValue = analogRead(A5);
  outputValue = map(sensorValue, 0 , 1023 , 0 , 180);
  servo_6.write(outputValue);
  delay(10);
}
Applications of the project:
- Manual Robotic Arm
- Pick and place robot
- Manually controlled walkable robot
- Solar tracker moment
- Antenna Positioning
- Doors opening
- Little application in conveyor belts
- Spinning and weaving machines
- Much more different applications
Conclusion
To get better knowledge on the concept of Servo Motors refer to the previous articles. As a reference, I am providing you the video of the tutorial you can also follow that. I hope that you all are clear with the concept of Controlling Servo with Potentiometer. If you have any doubts please feel free to comment below.
