
How to Design for 3D Printing?
Introduction
We can design pretty much everything on software, but when the model we made has to be printed a host of physical considerations have to be kept in mind to successfully realize the model. There are some basic considerations which are needed to be followed to ensure a relatively errorless print. It is important to know, how to design for 3D printing
How long does 3D printing take?
3D printing a part can take anywhere from a few minutes to a few days, depending on the size and complexity of the model to be printed. Due to this huge variation in completion time, it becomes crucial to estimate how much time your model is going to take to print. For this purpose, a slicing software can be used, for eg: Cura. The software analyses the G-code, which is nothing but a list of instructions from an STL file that the 3D printer can understand, along with various other physical factors to generate the expected total time. Note that the software provides exclusively the time taken to print, hence the time taken for the printing bed to heat and time taken for post-print efforts are not taken into account. Varying factors like the layer height can significantly change the time to print, and the pros and cons of changing certain settings need to be taken into account before starting the printing process.
Basic Design Considerations
Overhangs in 3D printing
These are the protruding parts of a structure that when 3D printed have successive layers going outwards from the previous layer. Careful consideration about the stability of the structure is to be taken when there are overhangs present in the design, as these can cause instability and lead to a failed print, especially when the angle of the overhang is very steep. Any 3D printer can design objects with an overhang of up to 45 degrees without dropping the object, a steeper angle requires supports to be provided so that the printing takes place without any mishaps.

Wall thickness
Another crucial consideration while 3D printing is wall thickness. Improper wall thickness can cause issues while constructing and cause print failures. If the walls are too thick then internal stresses can build up whereas if the walls are too thin then that causes the print to become fragile and susceptible to breaking. To overcome the different issues, you can analyze the design of 3D print.

Warping
While 3D printing, the material used for the construction of the model goes through various changes in the form of heating, melting or sintering. As the material cools, it starts shrinking which builds up stress in the structure and can cause deformation and cracks. Long and flat parts are especially susceptible to shrinking as heat treatment induces lengthwise contraction.

Sharp corners are also prone to deformation as they can act as stress concentration points, so these should be avoided as much as possible. An alternative is to create rounded corners which distribute the stress more evenly and mitigates many of the issues.
Support materials – Design for 3D Printing
To add extra stability to the structure being printed, support structures are used. Different types of support materials are available each with its pros and cons.
Materials as their own support
The easiest way to add support is the same material that the model is made of. This can be achieved using a single extruder machine and hence is an economical option for those who don’t want to spend more on buying a multi extruder 3D printing machine. This method ensures that the model does not slip from the support as they are made of the same material so proper adhesion is guaranteed, however, this adhesion makes it harder to remove the support structures after the print has been completed and post-processing finish is also of poorer quality. This method is suitable for people who want to save some money and don’t mind the poorer finish.
Breakaway support
These supports are easier to peel off and give a better surface finish than build material supports. Being made of a different material than the build material, the adhesion to the model is lower too. However, material compatibility has to be taken care of to ensure that the supports are doing proper justice to their job.
Soluble support
As the name suggests, these supports dissolve in certain solvents leaving behind a clean surface finish. These structures provide the best possible surface finish and can allow for complex designs to be printed without worrying about not being able to break certain support structures in areas inaccessible to tools. Being soluble, these structures can be made as dense as required without any extra effort to be put post-printing. However, there are certain drawbacks, these materials are very expensive and difficult to store. For example, PVA, the most commonly used soluble support, is highly hygroscopic and can degrade in the presence of moisture in the air. Some of these supports can take hours to fully dissolve and won’t suit people who don’t have the time.
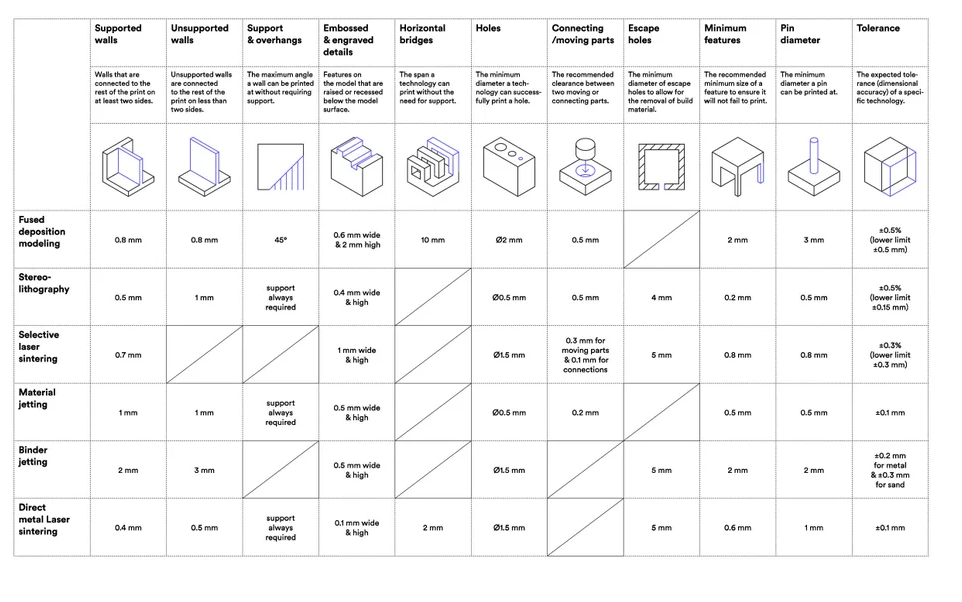
Design considerations for different printers
Get your First 3D Print for FREE – Click Here